

![]()
|
|
|
|
This instruction is specific to the Printer Client application. However it assumes that this module is an addition to the existing CDAT Client suite and that the main CDAT installation process has been completed. The Printer Client is part of the original CDAT 2000 program suite. It has been upgraded to CDAT 2006 specifications. Warning: The target audience for this page is at the technician level. Changing some settings described below can result in the client failing. Settings are saved in registry so rebooting the client will not clear incorrect settings.
The Printer Client delivers a serial data stream to a printer via a Serial Com Port or the designated Windows printer. The main reason for using the serial printer is to preserve paper by using a tractor feed type printer which is capable of printing single lines of text in a single CLI data transfer. The Windows printer is normally a laser or inkjet designed for printing a page on each data transfer. Therefore it is not generally a useful resource unless the Windows printer has been installed as a tractor feed printer. 1.3 Setting up the Printer Client Before the printer can accurately print the CLI information it must be formatted for the type of printer connected. Some formatting is generic and some is dependent on the model and style of printer. The setup supplied with the installation files is for a serial tractor feed type and will work with most dot matrix type printers which are largely at the cheaper end of the printer market. 1.3.1 Printer Configuration The CLI information is formatted for the printer in the Field Display Format frame. This frame has two sections, the Global Format frame, and the individual CLI field editor. The Global format considers the CLI record as a whole while the field editor determines which fields are to be displayed, their order and how each field is formatted.
There is also some additional formatting in the General Tab. These configurations are more to do with the printer type. There is the Printer selection, Display, Enable etc.
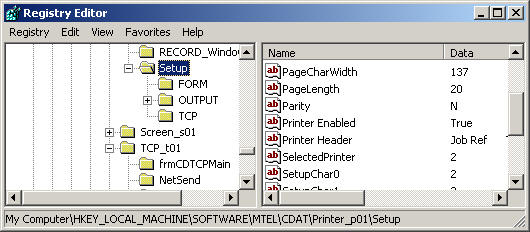
1.3.2 Global Format The Global Format frame is located in the Client Setup under the Output Format tab and in the Field Display Format frame. The Global Format is mainly concerned with the CLI record as a whole and how it fits to the width of the printer page. Maximum Lines per Entry is used to truncate information exceeding this limit. The default is 1. The upper limit is 50 (hard coded). Fixed Number of Lines will pad out the extra lines with CR LF. The default is False. Indent new lines assists in reading one CLI record by indenting the number of characters from the first line in the CLI record. The default is 0. Show Trunc Indicator displays the text "{more}" indicating that the CLI record was truncated by the formatting. The default is True. Format Text Post Lines is the number of CR LF after the CLI record. The default is 0.The upper limit is 20 (hard coded). Characters/Line is the maximum total width of characters across the page. The default is 138. The upper limit is 1000 (hard coded). Max Display Entries is the maximum lines displayed in the Output window which mimics the printer output. The default is 50. The upper limit is 10000 (hard coded). Single Record produces a single CLI record in the Output window display. The default is False.
These fields can be changed in the setup window or alternatively by editing the registry directly. The windows below show the location of the registry.
1.3.3 Field Display Format
Under construction.
DStore.AddLog 3, CStr(l_intLinesPerEntry) ' 0.
l_intLinesPerEntry
1.3.4 Printer Display
Under construction. 1.3.5 Printer Communication
Selected Port provides a selection to all known Com Ports available under the Windows operating system. Enable Full Printer/Port List allows all the available printers to be viewed not just the serial Com Port types. Parity is the serial port parity. Typically this is set to no parity, eight bits, one stop bit. Baud Rate is the baud rate of the printer. Typically this is set to 9600 baud. Page Width reflects the setting from Global Format, Characters/Line and is the maximum total width of characters across the page. The default is 138. The upper limit is 1000 (hard coded). Page Length is the number of lines per page before a Form Feed is sent to put the paper at the correct perforation position. The default is 0. The maximum is 300 (hard coded). Setup Chars are up to 5 control characters which can be sent to the printer whenever it is brought on line. The characters are normally an escape sequence to put the printer into a particular printing style. e.g. condensed print. The printer manual will provide the escape sequences for the appropriate printing style.
1.3.6 General Setup
Version is the revision number for the client. See the revision lists for the current version. Allow multi-sized Windows allows the output windows to be resized on the screen. Printer Enabled simply stops data from going to the printer. Data is not buffered. If a CLI is received when this is disabled the information is lost. CDAT Field Data File is the location of the database which defines the CLI data structure. Currently this is known as the MOLI data structure. DStore File is the location of the Output Format Field Display information file. This is only valid in the CDAT 2000 version. In CDAT 2006 this information was moved to the registry. The file contains all the formatting information generated Field Display. For more information on how to configure the fields see the section Field Display Format.
1.4 Printer Cabling The printer device requires a minimum of 4 wires for correct communication with the Printer Client. The following is a description of the cable requirements for a standard 9 pin Computer port to a 25 pin printer device connection. Pin 3 (DB9) is the transmit wire. The information is sent on this wire. Pin 2 (DB9) is the receive wire. It is used in XON/XOFF systems to stop the computer over-running the printer buffers. This flow control is not used by the Printer Client. Pin 5 (DB9) is the reference ground wire. Pin 8 (DB9) is the CTS wire. This is critical in the Printer Client as the client uses hardwire handshaking on this pin. +Volts indicates printer ready. 0 Volts (printer device turned off) or -Volts indicates printer disabled. When the printer is turned off or the printer can no longer receive data the CTS will be disabled and this state can be monitored on the Printer Client.
Buffered data will be sent to the printer device immediately after the CTS is enabled. The table below is a typical cable connection for a serial printer.
|
|
|
 This diagram shows the printer is offline and the
client will buffer the data until the printer is ready. Whist in this state
the printer will never receive data from the client. About 100 records are
buffered in the client during this state.
This diagram shows the printer is offline and the
client will buffer the data until the printer is ready. Whist in this state
the printer will never receive data from the client. About 100 records are
buffered in the client during this state.  This diagram shows the printer is ready. Pressing the Pause button
then the Resume button will send header information to the printer.
This diagram shows the printer is ready. Pressing the Pause button
then the Resume button will send header information to the printer.