
![]()
|
|
|
|
TCP Client
This instruction is specific to the TCP Client application. However it assumes that this module is an addition to the existing CDAT Client suite and that the main CDAT installation process has been completed.
The TCP Client delivers the original X25 packet in its delimited form along with additional fields to the VisiCAD servers. Each packet is completely self contained and the entire information is delivered in a single packet. Technically the TCP Client is called TCPIPND Client as it indicates the TCP information is the original IPND data format as originated from Telstra X25 system. The only difference is the Telstra X25 system delivers the packet in two or three packets which require reassembly. The IPND packet originates from the CDAT system and is passed by this client to the VisiCAD system. The information in the IPND is complete and all fields are transmitted. There are two main areas to be configured before the server will function correctly. The TCP settings for the VisiCAD system and the output TCP settings to communicate with the CDAT system. 1.3.1 VisiCAD Settings Even though the TCP Client delivers information to the VisiCAD system it connects via TCP as if it is a server. It simply configures the socket with the port settings from the registry and uses the local IP for the address. It opens the socket for listening and waits for the VisiCAD system to connect to it. The window below shows the location in the application to change the port if required. The default is 7000.
To make changes to the default go to the setup
tab by clicking
In the default mode just after running the application for the first time, the Access will be be unlocked. The default password is "password" if the client access is locked without changing the password. If the access password is lost or unknown then stop the application (make notes of its settings if it was running correctly) and delete the registry entry for the client. When the application starts again the password will default allowing you access to the setup again. Simply enter the new port location and hit the save button. The information is stored immediately to the registry and it stops the existing socket and restarts a listen on the new socket. To get to this configuration simply click on the grid icon in the menu to take you to the setup window.
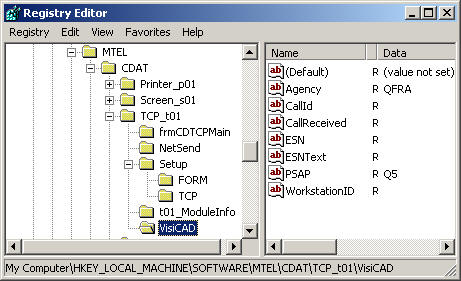
The window below shows the registry location of the port (ORG2ANS_PORT) used in the socket. In the past application development, the registry information for the client was located in HKEY_CURRENT_USER. The main reason for moving to Local Machine was some systems had multiple users and the configuration had to be setup for each user. Putting the information in Local Machine made one configuration available to all users. In the window below are the configuration settings for the additional fields which are appended to the IPND data. These fields are specific to the VisiCAD system. They are at this point in time hard coded to the registry settings. However two of the fields can be changed on the Client Setup form.
The extra fields are not used in the current VisiCAD system except for two. They are the agency and PSAP fields. These can be changed in the application by going to the setup window in the application. Just click on the grid icon in the menu. These settings are lumped together as the PSAP Setting. Just change the text box information and hit the save button. The settings are saved in registry immediately and the new settings will become immediately available on the next packet sent to the VisiCAD.
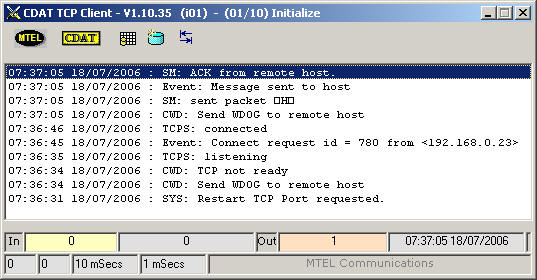
1.3.2 CDAT Settings Also see the Client Start-up page. The link is in the index page. When starting an application for the first time the registry is generally non existent and so the application will establish a registry with default values and display a set up box as shown below. The Server Port is nearly always 6000 and should be changed only if it clashes with other applications. The Server Address is either an IP address or a host name. The client identifier should start with an "t" and can be "t01" to "t99". Hit the OK button and the application will start but initially will not attempt to connect to the Hub. The banner should indicate the state of the Hub connection and it should be at the intialisation state as shown in the banner in the window below. Now the settings are ready, the application can be started. The window below shows the Client in the output window. You can get to this window at any time by clicking on the blue disk icon in the menu. Clicking twice on the same icon will alternate between maximised and minimised screens. Note the window size is always remembered when the application is shut down as it stores the window size and position in registry as the application closes. The first task the client will perform, is to setup the TCP Listen port for the VisiCAD to connect to. In the window below is the the output log showing the client listening then connecting to the VisiCAD system. Once the TCP connection is complete packets can be sent. The first in this example is the heart beat packet used to test the link connectivity at the application level.
Once the packets are following across the LAN, some basic statistics are kept of the packet round trip performance. In the boxes at the bottom of the application are packet counters into the client of CLI packets from CDAT. There are also counters of TCP packets leaving the client going across the LAN to the VisiCAD. There are also round trip delay measurements of the packet and its acknowledgement between the clients and an average of the last ten packets. Over a period of thirty seconds there will be entries for the watchdog system which is a special packet sent between the applications to let each system know there is a valid TCP connection. If the watchdog fails a warning is generated at both ends of the link. Note that the watchdog is included in the delay measurements.
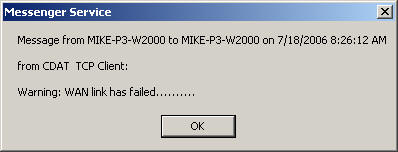
1.4.1 Link Failure If the client watchdog expires, that is no acknowledgements to the heartbeat or IPND packets then an alarm is activated. If the link does fail an alarm message is sent to the operating systems network Messenger Service. An example of a LAN failure is shown below. This service is provided by W2000/XP systems and can be any sent to any valid host address. This can be an explicit IP address such as 192.168.0.1 or the machine host name such as "mike-p3-w2000" in the example below. The window below indicates the Messenger Service showing the message that can be sent anywhere on the existing LAN. Normally the recipients are supervisors and maintenance staff.
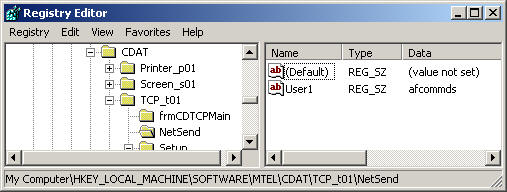
Once the link is re-established it will send a link restored message. The application will also indicate that the application has stopped and started as well. The addresses for Net Send are currently stored in the registry. The only way to edit these entries is via the registry editor. The window below shows the location of the NetSend registry and the types of values that can be entered. To configure the IP addresses of all the intended recipients go to the registry location shown below and enter up to nine IP addresses. Note the addresses can be host names. The registry string should be "User1", "User2" etc to "User9". Valid address are IP such as 192.168.0.1 or "afcommds" as shown below.
The messages sent using Messenger Service are also stored in the Event Viewer in the Control Panel, under Administrative Tools. Once your settings are correct and the application is running correctly, it is a good idea to export your registry into a .reg file from the MTEL directory and its sub-folders and contents. If the system gets a corrupted registry (usually from a poor power interruption) then the applications can be restored quite quickly and accurately by importing the .reg file. |
|
|
 on
the grid in the menu. This will take you directly to the setup menu. The
configuration is password protected and you must correctly enter the
password before any settings can be changed. The default password is
"password" and is case sensitive.
on
the grid in the menu. This will take you directly to the setup menu. The
configuration is password protected and you must correctly enter the
password before any settings can be changed. The default password is
"password" and is case sensitive.