AL-A25 Programming Instructions
The AL-A25 pager has a special programming mode to allow it to be allocated
to any carrier in Australia. The programming is usually done by the carrier, in
this case Hutchison (now Vodaphone Paging) or MTEL.
This list of instructions is provided to help managers to allocate pagers and
speed up the delivery of pagers to the users.
This list of instructions has been very carefully edited to help with the
allocation of the correct parameters for successful operation of the pager.
However MTEL does not warrant this information nor accept
responsibility for incorrect interpretation of these instructions.
Programming the pager consists of scrolling through a set of screens designed
to change or check the pager parameters.
Before programming note that messages will be lost on the pager. The time
will also need to be set to the correct time.
Programming buttons are displayed below.
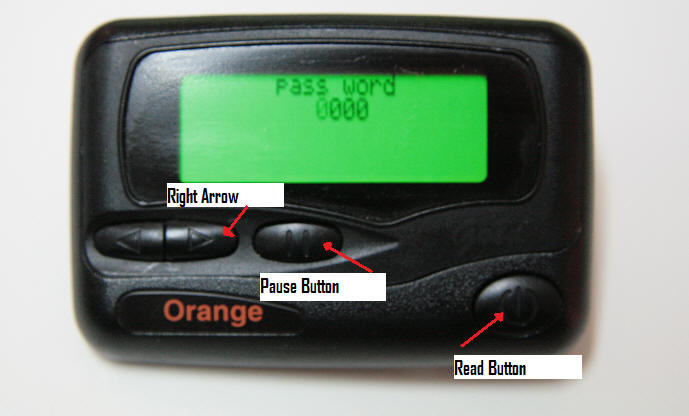
To enter the programming mode requires two hands. Hold the pager with the
battery cover and battery removed in one hand and press the middle
pause button down and hold it down with the other
hand. Now replace the battery with the pause button
being permanently pressed. After 2 seconds the pager will display the password
screen. See below.
Note pagers allocated by MTEL will jump straight to the Capcode screen.
The password and frequency allocation for these pagers is fixed.
Password:
If the pager has been correctly started in program mode the following
screen will appear.

The first digit will be flashing. This is a password to move to the
remainder of the programming screens. It should always be 0000. If the
password was changed then the pager will not be allowed to be programmed and
the pager will return to normal function.
To move to the next screen simply press the large
Read button on the right hand side of the pager. Use the same button
to move to the next screen in all the instructions below.
Frequency:
The next screen to appear is the Frequency allocation.

The second digit will be flashing. In the case above the 4 will be
flashing.
This is the transmission frequency for the pager. There are only two
national carrier bands left in Australia. It is important to know the
correct frequency. MTEL only allocates pagers on 148.6375MHz. Vodaphone has
two frequencies. The majority of pagers are on the F2 network 148.6375MHz
(same as MTEL). There is also the original F1 network 148.5625MHz.
If the frequency is unknown leave it at the default. In general when the
pager is allocated it will have this already set to the correct value.
Move to the next screen by pressing the large
Read button on the right hand side of the pager.
Capcode Allocation:
The capcode is the air interface number that
the paging network sends to the pager via radio transmission. It is
NOT the pager number which is sent by MTELPage,
VisiCAD or via Hutchison operators. The capcode is allocated to the pager by
the carrier either Hutchison or MTEL. If the pager is repaired the capcode
is often changed, however the pager number is constant.
In short the pager number is a label, the capcode is the activation code
inside the pager. The translation from pager number to capcode occurs at the
MTEL or Hutchison network interfaces.
If the capcode is unknown contact MTEL before attempting to change this
number.
There is the ability to use 4 capcodes for normal pager use and another 2
for special uses.
Do not use capcode 5 and 6.
If there is a requirement to use more than 2
capcodes, contact MTEL to ensure the allocation of capcodes will be
consistent.
QFRS capcode allocation:
Most pagers are allocated 2 capcodes. Hutchison pagers are often
allocated an individual capcode in position 1. The QFRS do not use this
number in auxiliary groups as a group capcode is allocated in position 2. It
is this group number that is used for turnouts.
QAS capcode allocation:
In the QAS pagers only the first capcode is used.
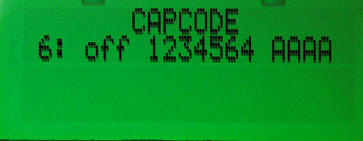
Move to First Capcode:
The next screen displays the first of 6 capcodes.
All capcodes are entered as 7 digits. If the capcode allocated is less
than 7 digits then make the preceding numbers 0. e.g. a capcode of 12345
will be entered as 0012345.
The screen should appear as below.

The first capcode is always on. The first digit will be flashing
indicating that it is ready to be changed.
To change the digit, press the pause button once to increment the number.
When the digit gets to 9 it returns to 0 when incremented.
To move to the next digit press the right arrow
once. The
Next make sure the capcode type is selected as AAAA.
Sometimes this field is ---- if so it must be changed to
AAAA.
The A simply indicates alphanumeric use in all 4 function groups.
Function groups are nearly always superfluous in the current pager setups.
They are a product of previous decades of use and are no longer relevant to
modern paging services. They should not be ignored however and must to set
to AAAA.
Move to the next screen by pressing the large
Read button on the right hand side of the pager.
Move to Second Capcode:
The second capcode should display a flashing on or off as shown
below.
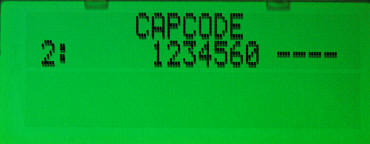
Push the pause button to toggle the capcode
on or off.
Push the right arrow to move to the first digit of the capcode.
The first digit will be flashing
indicating that it is ready to be changed.
Change the capcode to the correct number as described in First Capcode
instruction above.
Make sure the function is AAAA.
Move to the next screen by pressing the large Read
button on the right hand side of the pager.
Move to Third Capcode:
The third capcode should display a flashing on or off as shown
below.
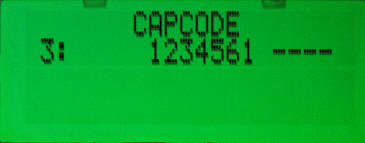
The instructions are the same as in capcode 2.
If a third capcode is added, check with MTEL as allocating more than 2
capcodes can be confusing.
Move to the next screen by pressing the large Read
button on the right hand side of the pager.
Move to Fourth Capcode:
The fourth capcode should display a flashing on or off as shown
below.

The instructions are the same as in capcode 2.
If a fourth capcode is added, check with MTEL as allocating more than 2
capcodes can be confusing.
Move to the next screen by pressing the large Read
button on the right hand side of the pager.
Move to Fifth Capcode:
The fifth capcode should display a flashing on or off as shown
below.
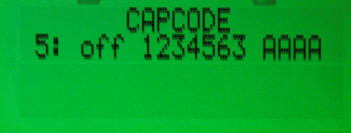
DO NOT USE
Move to the next screen by pressing the large Read
button on the right hand side of the pager.
Move to Sixth Capcode:
The sixth capcode should display a flashing on or off as shown
below.
DO NOT USE
Move to the next screen by pressing the large Read
button on the right hand side of the pager.
Move to Baud Rate:
The baud rate should display a flashing 512, 1200 or 2400 as shown
below.

The baud rate is the speed of the data transmission to the pager. 512
means 512 bits per second or roughly 40 character a second. So a large
message takes about 4 second to transmit to a pager.
At 1200 the message is sent in under 2 seconds.
The first pagers were 512 back in the 1990's. By the mid 1990's the pager
were moved to 1200 so that the capacity of the networks could be increased.
The trade off is the network coverage shrinks at the edge of the radio
network footprint. i.e. 1200 baud pagers have a smaller coverage area than
512 pagers especially in single transmitter sites as in most rural centres.
To the user the baud rate speed improvement is insignificant to the
larger queuing delays of the message in the networks. Therefore the baud
rate of 512 or 1200 will NOT improve the overall speed of delivery.
The baud rate is allocated by the carrier, either Vodaphone or MTEL. In
general rural coverage the pager is 512 baud. In the cities it is 1200. 2400
is never used it is too fast for modern commercial pager networks.
If the wrong baud rate is selected the pager will
not work. Contact MTEL to determine the correct baud rate.
Move to the next screen by pressing the large Read
button on the right hand side of the pager.
Move to password:
The modify password ? should be displayed as shown below.

Under NO circumstances should the password be changed. Leave it as
0000. If it is changed from 0000 simply return it to 0000 before moving to
the next screen. If it has been changed throw the pager in the bin. If the
change was recorded simply restart the programming sequence and enter the
changed password. Then move to this screen and make it 0000 again.
Move to the next screen by pressing the large Read
button on the right hand side of the pager.
Adjust contrast:
The Adjust Contrast ! should be displayed as shown below.

In general this is a factory preset and won't require a change.
Move to the next screen by pressing the large Read
button on the right hand side of the pager.
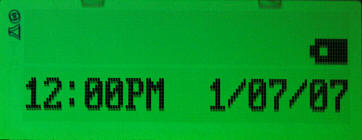
The pager will now program and display the result. It should show the
screen below

The pager will now return to normal operation. The screen below is
displayed. Note all messages have been deleted and the time is set to a
default.
Testing:
Always test the pager. Get the Comms Centre to send a
message or contact MTEL to help test the pager.
|